
Theme Selection
DashUI includes two visual modes that can be customized independently:
Dark: a dark interface with adapted surfaces and contrast.
White: a clean, bright interface.
Each mode maintains its own color configuration. Individual users can also select their preferred visual mode.
Global Styles
Control the main colors of your admin environment through six settings:
Global Background: sets the dashboard background color.
Main Surface: customizes the primary content areas.
Cards: defines the color of containers and visual elements.
Borders: controls the color of component separators.
Primary Text: sets the color of headings and content.
Secondary Text: customizes descriptions and supporting elements.
WordPress Sidebar
Customize the appearance of the WordPress navigation sidebar.
Menu Background: defines the sidebar background color.
Text & Icons: adjusts the color of navigation elements.
Hover / Active Background: sets the background color for hovered and selected items.
Hover / Active Text: controls text and icon colors in these states.
Buttons & Accent Colors
Adapt your dashboard controls to your brand's visual identity.
Available button styles:
Rounded.
Pill-shaped.
Square.
You can also customize primary and secondary button colors, text colors, hover states, and the global accent color used throughout the interface.
Live Preview & Configuration
DashUI includes a live preview that reflects your visual adjustments as you customize the theme.
How to configure Theme:
Open DashUI and navigate to the Theme module.
Select Dark or White.
Customize the colors and styles to match your brand.
Review your changes in the live preview.
Click Save to keep your configuration.
Restore Default Settings
Use Restore Current Preset to return the selected mode to its default values.
Important: restoring a preset replaces the custom colors saved for that mode. Color palettes are shared, while each user's Dark or White preference is stored individually.
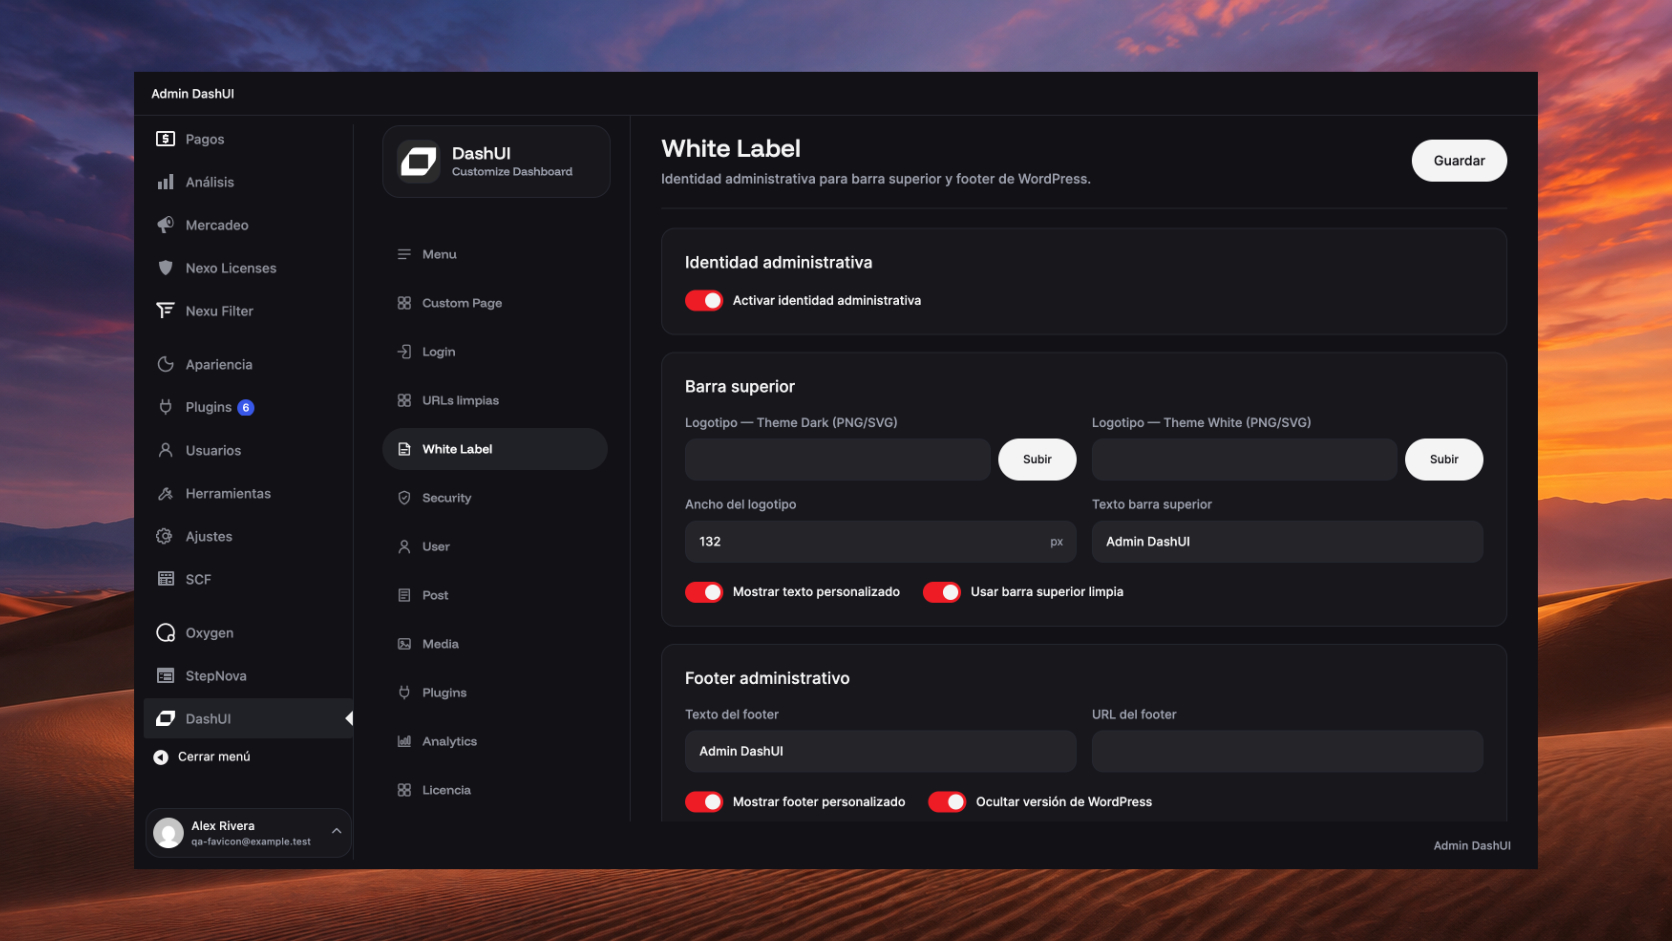
Activación de la identidad administrativa
El módulo incluye una opción principal para activar o desactivar la identidad administrativa personalizada.
Cuando esta opción está activa, DashUI aplica la configuración de White Label en la barra superior y el footer administrativo de WordPress.
Barra superior
Personaliza la apariencia de la barra superior administrativa con elementos de marca propios.
Opciones disponibles
Logotipo — Theme Dark: permite cargar un logotipo en formato PNG o SVG para el modo oscuro.
Logotipo — Theme White: permite cargar un logotipo en formato PNG o SVG para el modo claro.
Ancho del logotipo: ajusta el ancho del logotipo entre 40 px y 320 px.
Texto barra superior: define un texto personalizado para acompañar la identidad de la marca.
Controles adicionales
Mostrar texto personalizado: muestra el texto definido junto al logotipo o como identidad principal.
Usar barra superior limpia: limpia la barra superior administrativa para dejar visible únicamente la identidad personalizada.
Si no se configura logotipo ni texto, DashUI mostrará el nombre de marca definido en el sistema como respaldo.
Footer administrativo
Permite personalizar el contenido del footer dentro del área administrativa de WordPress.
Opciones disponibles
Texto del footer: define el texto visible en el pie administrativo.
URL del footer: agrega un enlace personalizado al texto del footer.
Controles adicionales
Mostrar footer personalizado: activa el footer de marca dentro del panel administrativo.
Ocultar versión de WordPress: elimina la versión visible de WordPress en el footer nativo.
Si se configura una URL, el texto del footer se mostrará como un enlace externo.
Vista previa
El módulo incluye una vista previa para visualizar cómo se verá la identidad administrativa aplicada en la barra superior y el footer.
La vista previa refleja:
La marca en la barra superior.
El modo visual actual.
El contenido del footer administrativo.
Cómo configurar White Label
Abre DashUI y entra al módulo White Label.
Activa Identidad administrativa.
Sube el logotipo para Theme Dark y/o Theme White.
Define el ancho del logotipo.
Agrega el texto de la barra superior si deseas mostrarlo.
Configura el texto y la URL del footer.
Activa las opciones complementarias según tu preferencia.
Revisa los cambios en la vista previa.
Haz clic en Guardar.
Consideraciones importantes
White Label solo modifica la barra superior administrativa y el footer administrativo.
No modifica automáticamente el login, el menú lateral, el tema general del dashboard ni otras áreas del plugin.
El logotipo cambia según el modo visual activo: Dark o White.
La barra superior limpia elimina los nodos visibles de la barra para destacar únicamente la identidad personalizada.
Create custom user roles and control access permissions within WordPress. With DashUI, you can define which content each role can view, edit, or manage, tailoring the workspace to each user's responsibilities.
Custom Role Creation
DashUI allows you to create new user roles using native WordPress permissions as a starting point.
Available Options
Role Name: define a custom name, such as Marketing, Content Editor, or Support.
Initial Permissions Based On: select an existing role as the starting point.
Available base roles:
Subscriber.
Contributor.
Author.
Editor.
Once created, the new role becomes available in WordPress and can be used within the Menu module to configure role-specific navigation.
Role Management
View and manage custom roles created through DashUI. Each role displays its name, the base role used, and the number of assigned users.
You can also:
Review created roles.
Identify roles assigned to a custom menu.
Delete roles that are no longer needed.
Important: roles can only be deleted when no users are assigned to them and they are not linked to a custom menu.
Role Permissions
Configure permissions for each custom role to control access to different content areas in WordPress.
Posts and Pages
Define specific permissions for:
View Only: access content without editing permissions through compatible DashUI views.
Create and Edit: manage personal drafts.
Edit Published Content: modify published content owned by the user.
Publish: allow content publication.
Edit Others' Content: extend editing capabilities.
Private Content: allow reading and editing private content.
Delete Content: manage deletion permissions for owned, published, or other users' content.
Tools
Configure additional permissions to:
Upload files to the Media Library.
Manage categories.
Moderate comments.
Changes apply to users assigned to the corresponding role.
SCF Content Permissions
DashUI supports custom content types created with Secure Custom Fields (SCF). When SCF is available, the User module detects registered content types and allows you to configure their permissions.
Available Features
Read-only access.
Content creation and editing.
Content publishing.
Editing other users' content.
Access to private content.
Content deletion.
To manage permissions independently, enable Rename Capabilities for the corresponding content type in SCF.
If a content type shares the native capabilities of Posts or Pages, DashUI preserves that relationship while allowing separate read-only access configuration.
How to Configure User
Open DashUI and select the User module.
Under New Role, enter a role name.
Select the initial permissions.
Click Create Role.
Open Role Permissions and select the newly created role.
Enable the viewing, editing, and management capabilities you need.
Click Save Permissions.
Assign the role to the appropriate users through WordPress.
If needed, use the Menu module to customize their admin navigation.
Important Considerations
DashUI only manages custom roles created through the User module.
Native WordPress roles are used as templates and are not modified by this editor.
Read-only permissions integrate with compatible DashUI views.
Some permissions require additional capabilities, which DashUI automatically assigns to maintain role consistency.
SCF configuration depends on the capabilities registered for each content type.
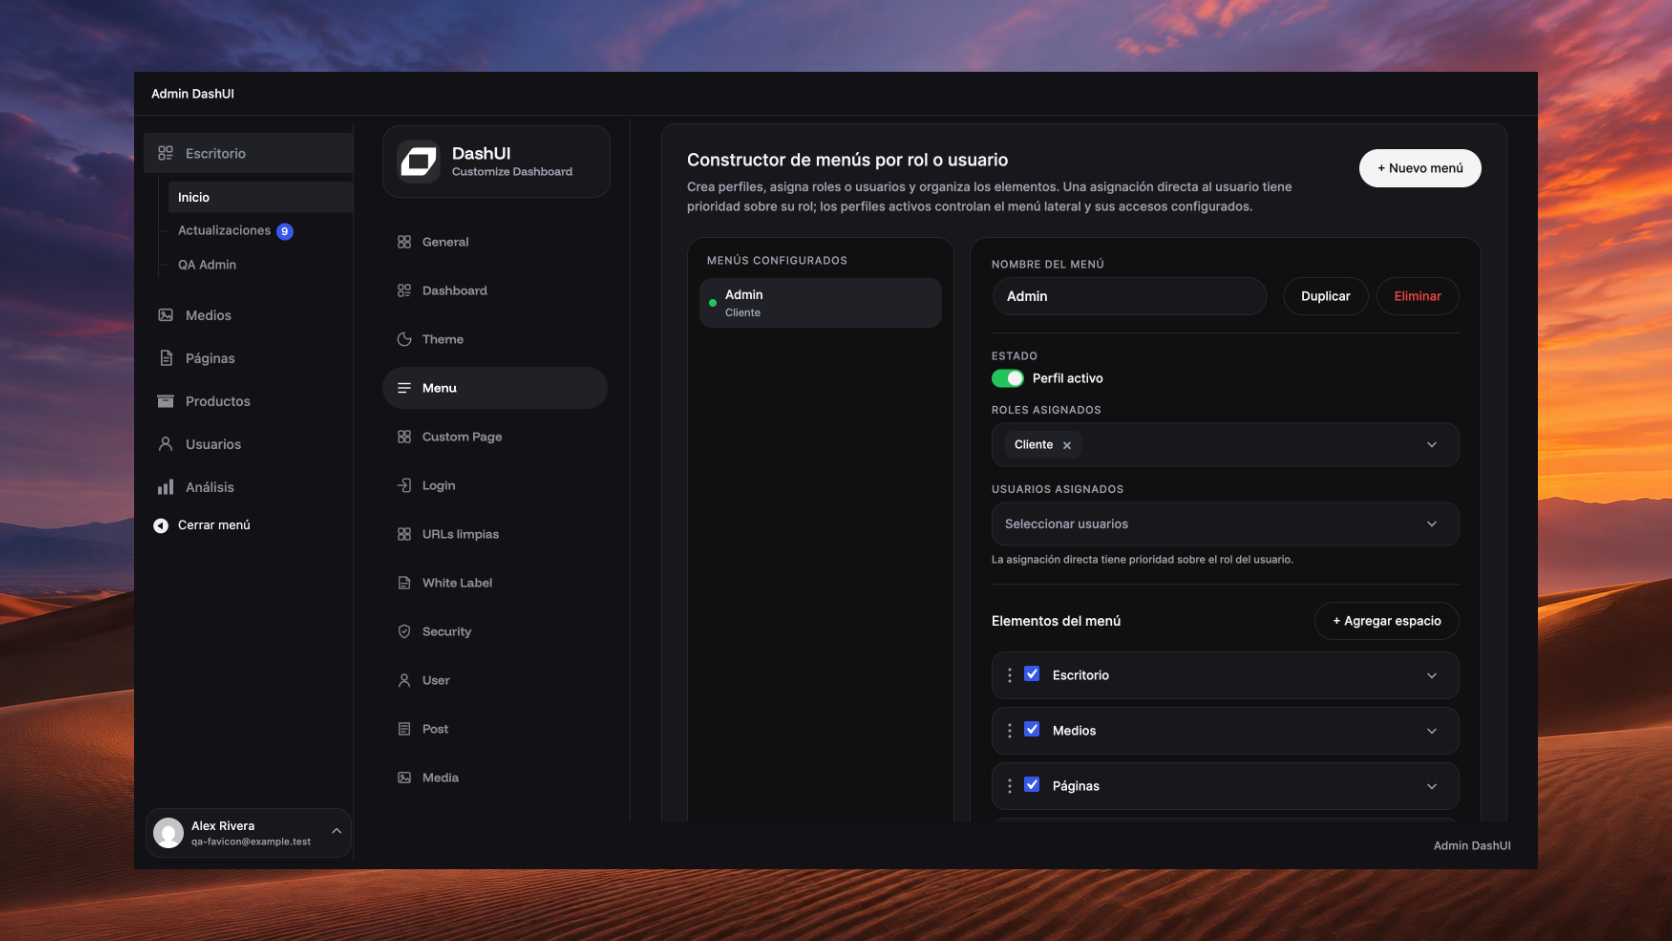
Transform your WordPress admin navigation with DashUI. Organize sidebar menu items, control their visibility, and create custom menus for individual roles or users, tailoring access to your project's needs.
Custom Menu Builder
DashUI includes a visual builder that allows you to create different configurations for the WordPress admin menu.
Available Features
Create Menu: generate a new navigation configuration.
Menu Name: assign a custom name to identify each menu.
Duplicate: create a copy of an existing menu.
Delete: remove configurations you no longer need.
Enable or Disable: control which menu profiles are active.
You can create multiple independent menus to organize different work environments, such as Marketing, Editors, or Administration.
Role-Based and User-Specific Menus
Assign specific navigation configurations based on each user's permissions and responsibilities.
Role-Based Assignment
Select one or more WordPress roles to apply a custom menu.
DashUI recognizes both native WordPress roles and custom roles created through the User module.
User-Specific Assignment. You can also assign a menu directly to one or more users, regardless of their assigned role.
Important: when a user has a direct menu assignment, it takes priority over any menu assigned through their role.
3. Menu Organization & Visibility
Customize which options appear in the admin sidebar and how they are organized.
Available Features
Show or Hide Items: control the visibility of admin sections.
Reorder Items: drag and drop menu items to change their position.
Manage Submenus: individually show or hide options within each section.
Add Spacers: insert visual separators to organize navigation groups.
The builder uses menu sections and submenus registered in WordPress, including those provided by compatible plugins.
Access Control
For certain DashUI-compatible sections, you can configure three access modes:
Edit: allows users to work within the section according to their editing capabilities.
View Only: provides read-only access through compatible views.
Hidden: removes the section from the configured menu and restricts direct navigation to its recognized admin routes.
Available access modes depend on each section's capabilities and integration.
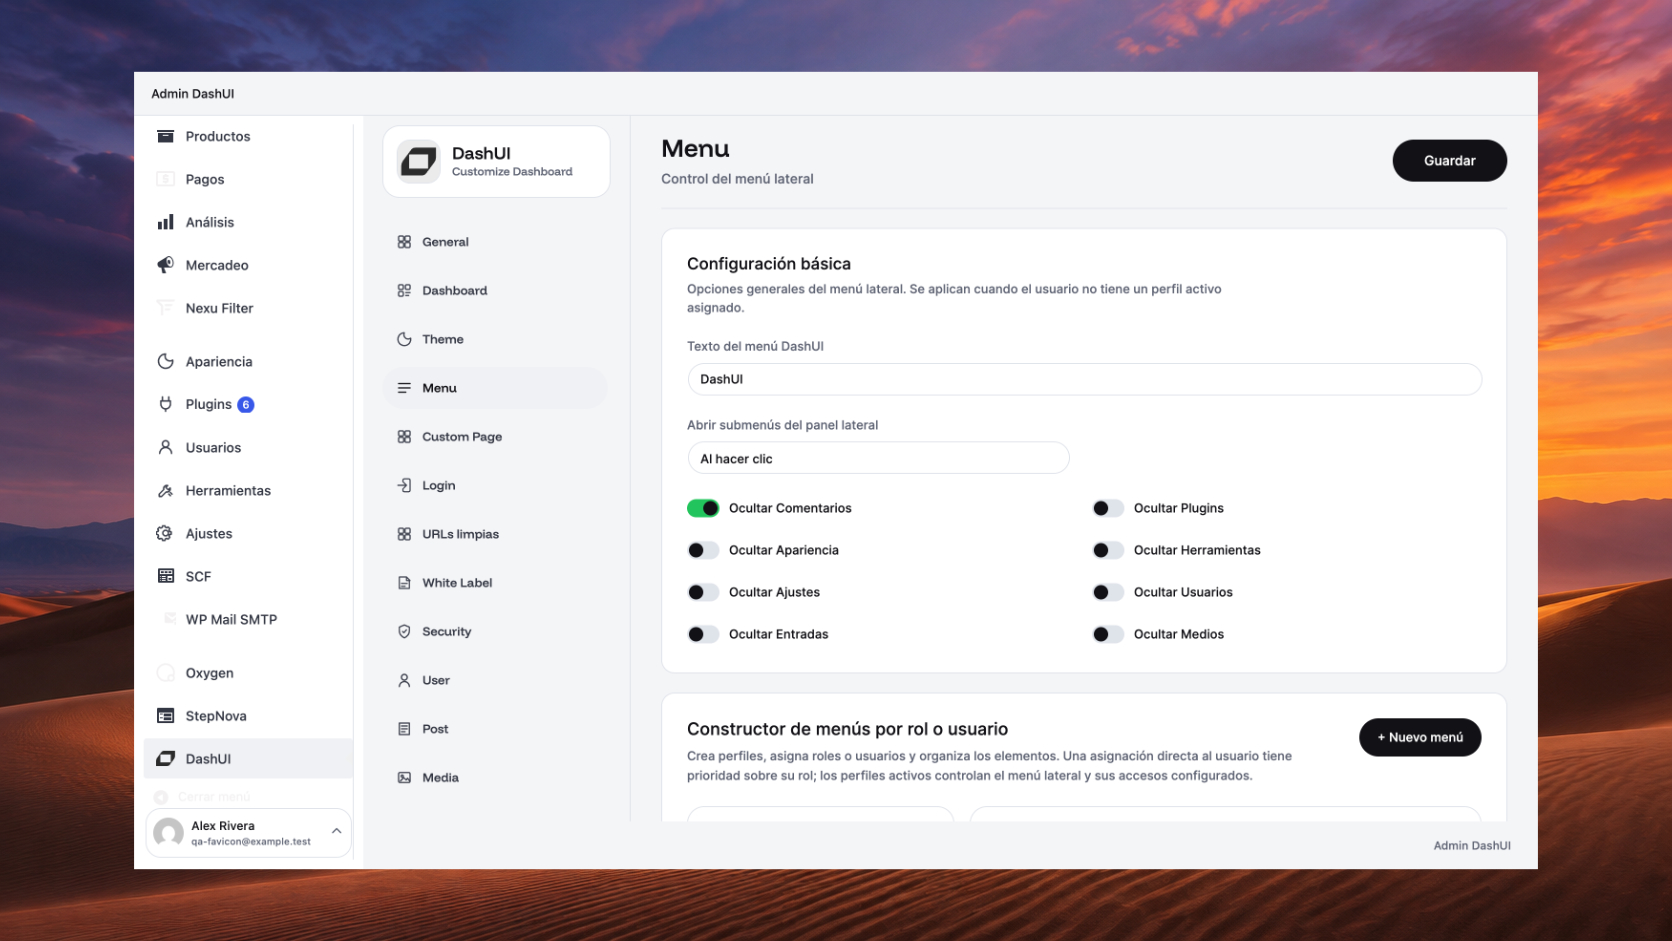
Basic Menu Settings
In addition to the profile builder, DashUI includes general settings for customizing the WordPress sidebar menu.
DashUI Menu Name
Define the text used to identify DashUI within the admin navigation.
Submenu Behavior
Choose how submenus open:
On Click: opens the submenu when the user selects the section.
On Hover: opens the submenu when the cursor moves over the section.
Hide Native Menu Items. Individually hide the following sections:
Comments.
Plugins.
Appearance.
Tools.
Settings.
Users.
Posts.
Media.
Note: these general visibility settings apply when a user does not have an assigned active menu profile.
How to Configure Menu
Open DashUI and select the Menu module.
Click + New Menu.
Enter a name for the configuration.
Select the roles or users who will use the menu.
Organize the items using drag and drop.
Enable the sections and submenus you want to display.
Add separators to organize navigation if needed.
Configure the available access modes.
Activate the profile and click Save Menu.
Managing Existing Menus
From the Configured Menus list, select any saved profile to edit, duplicate, deactivate, or delete it.
Important Considerations
The builder uses registered WordPress admin menu items; it does not create arbitrary external navigation links.
Active menu profiles take priority over basic visibility settings.
Direct user assignments take priority over role-based assignments.
Hiding a section through basic settings does not remove the user's original permissions.
Active profiles include direct-navigation protection for recognized admin screens, but they do not replace WordPress's permission system.
WordPress Multisite network super administrators retain unrestricted admin navigation.
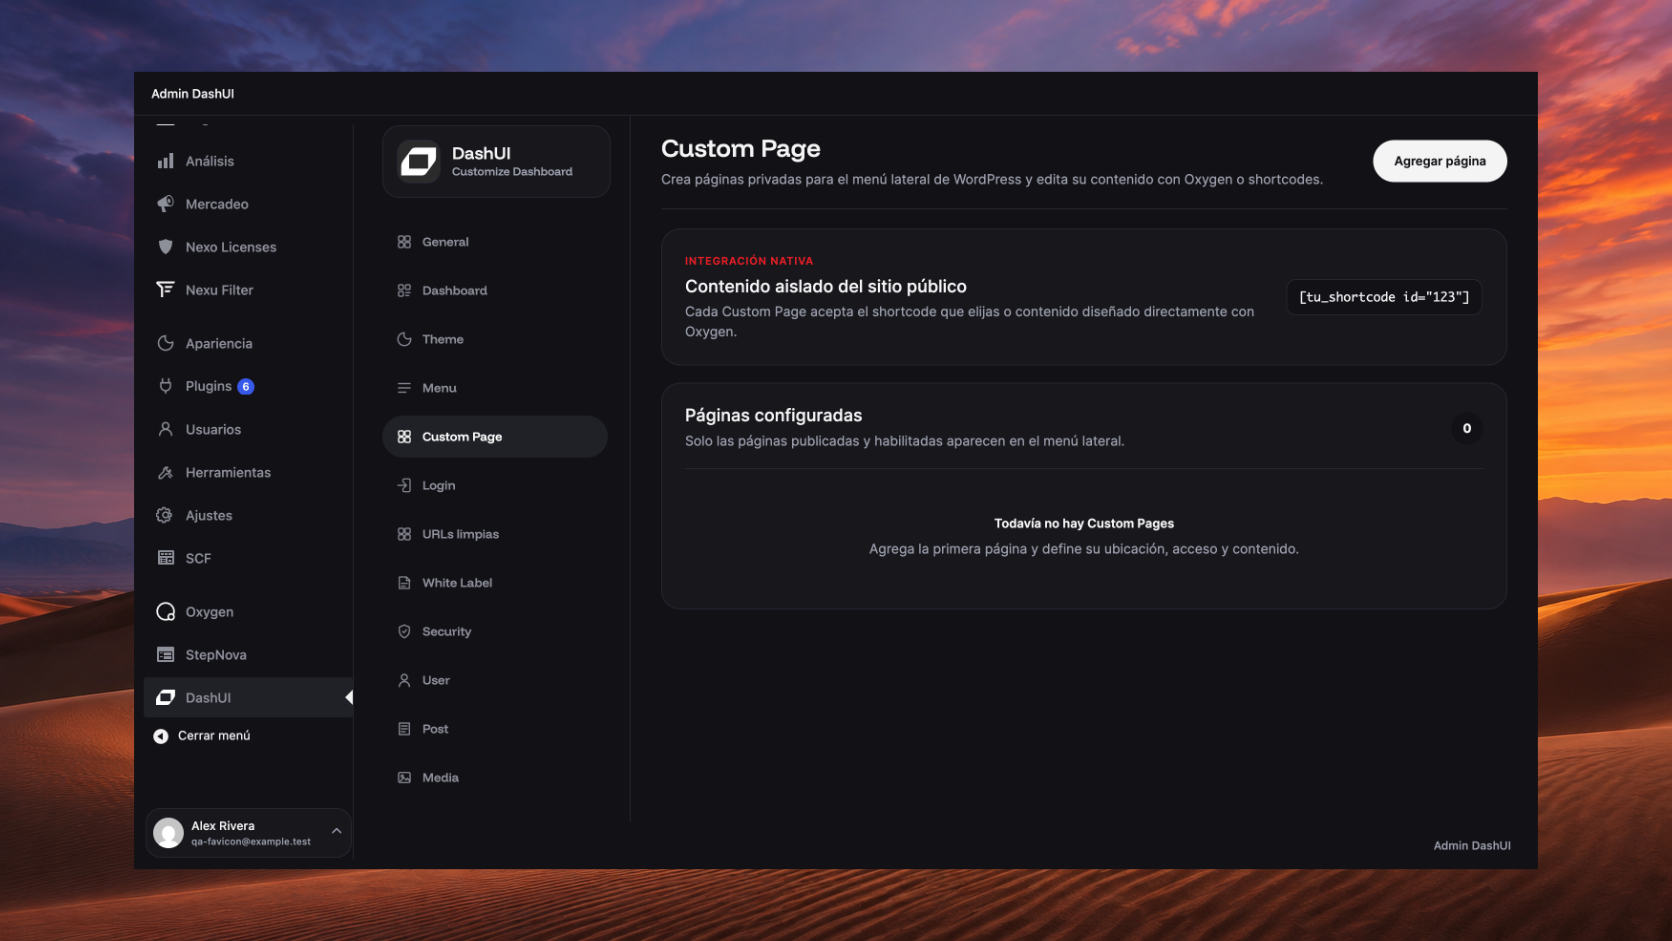
Create custom pages within your WordPress admin dashboard with DashUI. Integrate content designed with Oxygen Builder or shortcodes, organize its location in the sidebar menu, and control who can access each page.
Custom Page Creation
DashUI allows you to create independent pages that add new sections to the WordPress admin environment without modifying your website's public pages.
Available Features
Add Page: create a new admin page.
Page Title: define the name that identifies the page.
Show in Sidebar Menu: enable or disable its appearance in the admin navigation.
Configured Pages: view created pages, their locations, and publication status.
Configure: access the settings of an existing page.
Only published and enabled pages appear in the admin menu.
Navigation Customization
Configure how and where each Custom Page appears within WordPress.
Available Options
Menu Text: customize the name displayed in the admin sidebar.
Location: choose where to place the page:
Top-Level Menu.
Dashboard.
Posts.
Media.
Pages.
Comments.
Appearance.
Plugins.
Users.
Tools.
Settings.
DashUI.
Position: set the page's menu order using a numerical value from 1 to 999.
Dashicons Icon: assign a native WordPress icon when the page is displayed as a top-level menu item.
Access Control
Define who can view each admin page using native WordPress capabilities.
Available Access Levels
All Users with Dashboard Access: users with read permissions.
Authors, Editors, and Administrators: users with post editing capabilities.
Administrators Only: users with permission to manage WordPress settings.
Each Custom Page can have its own access configuration.
Permissions are checked before displaying the page content within the admin dashboard.
Oxygen Builder & Shortcode Integration
Custom Page allows you to display personalized content using resources available in WordPress.
Oxygen Builder Content
Integrate content designed with Oxygen Builder to create custom administrative interfaces tailored to your project's needs.
This allows you to use the builder's visual design capabilities and components within a custom admin page.
Shortcode Content
Insert a shortcode in the Content Shortcode field to display content generated by other compatible plugins or features.
Example:
[your_shortcode id="123"]
DashUI processes the shortcode and displays its output within the Custom Page.
Page Reusability
Each page includes its own shortcode for reusing its content:
[mraos_custom_page id="123"]
Replace 123 with the actual page ID.
When a content shortcode is provided, DashUI uses it as the primary content source. Otherwise, it processes the page's saved content.
How to Configure Custom Page
Open DashUI and select the Custom Page module.
Click Add Page.
Enter the title of your new page.
Enable Show in Sidebar Menu.
Customize the menu text, location, position, and icon.
Select the appropriate access level.
Add content using Oxygen Builder or a shortcode.
Publish the page.
Return to Custom Page to review its configuration.
Managing Existing Pages
From Configured Pages, you can review created pages, identify their locations, and access their settings.
Important Considerations
Custom Page creates pages inside the WordPress admin environment; it does not generate independent public routes.
Pages must be published and enabled to appear in the admin menu.
Creating and configuring Custom Pages requires administrator permissions.
Page visibility depends on its configured access level.
Content is displayed inside an iframe integrated into the admin dashboard.
Oxygen Builder compatibility depends on the builder being available and configured in WordPress.
Reusing a Custom Page shortcode on a public page may expose its content publicly. Only use this feature when the content is suitable for that context.
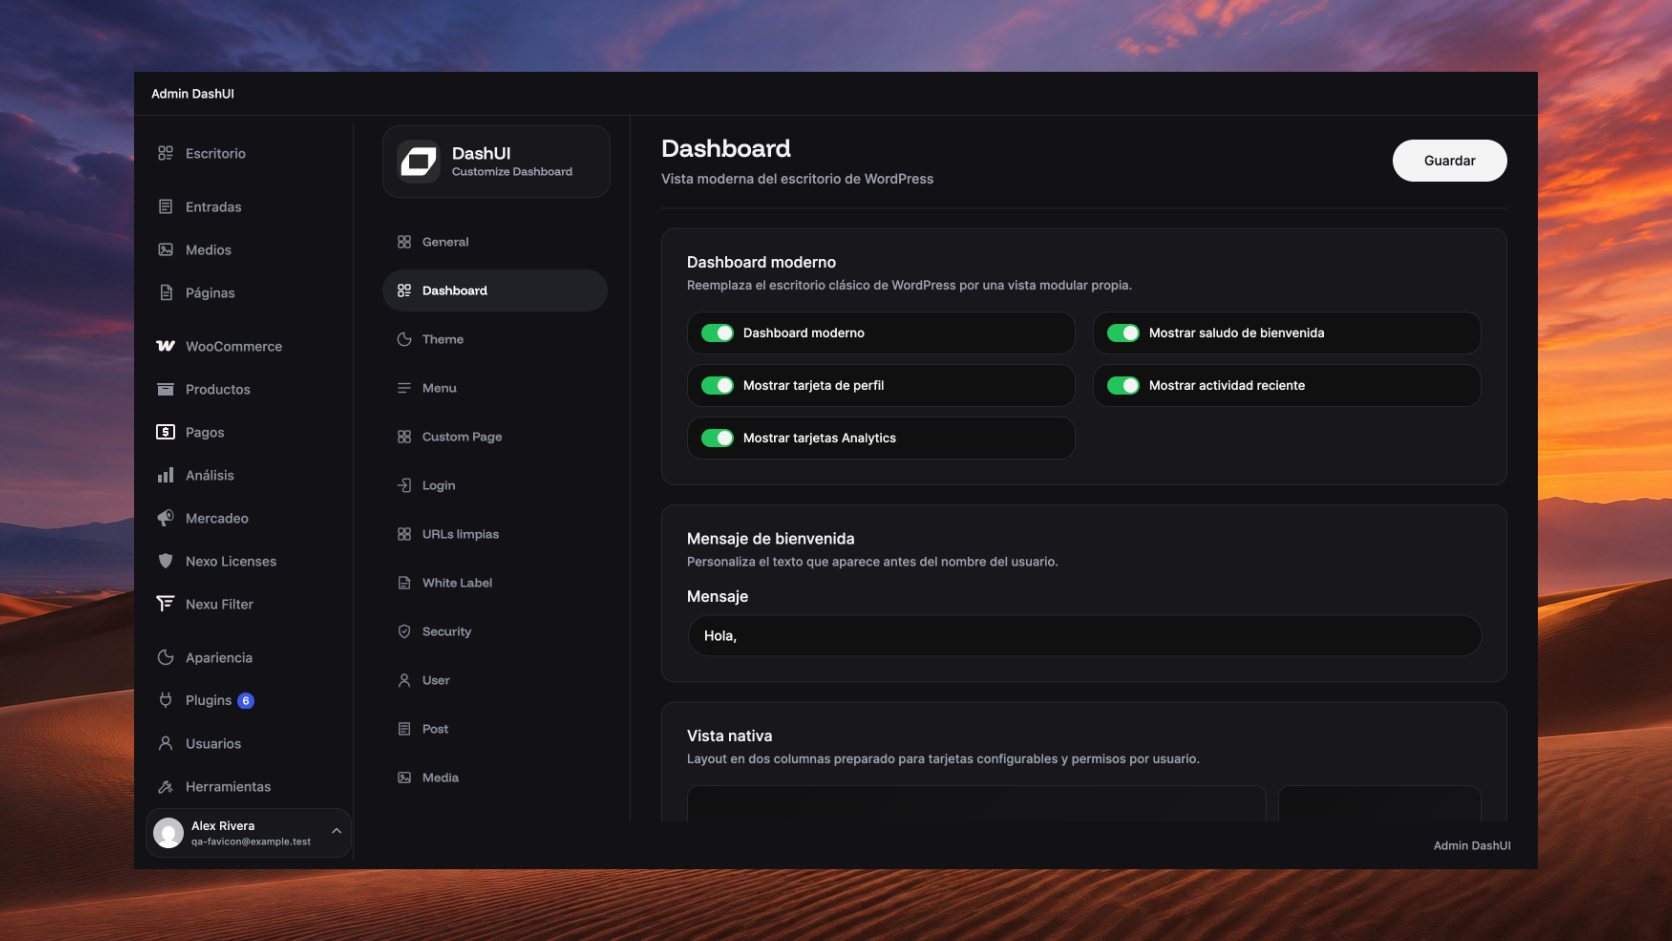
Transform your WordPress dashboard into a modern, organized, and customizable workspace with DashUI. Access relevant information, monitor website activity, and arrange dashboard cards according to each user's needs.
Modern Dashboard
DashUI allows you to replace the classic WordPress dashboard with a custom interface organized into independent cards and sections.
Available Options
Modern Dashboard: enable or disable the redesigned dashboard interface.
Show Welcome Greeting: control the visibility of the personalized header.
Show Profile Card: display or hide user profile information.
Show Recent Activity: control the visibility of recent content activity.
Show Analytics Cards: enable the statistics section for authorized users.
When the Modern Dashboard is disabled, WordPress retains its traditional dashboard.
Information Cards
The Modern Dashboard includes six cards that provide quick access to relevant website information.
Profile
Displays information about the currently logged-in user:
Name and profile picture.
Assigned user role.
Email address.
Last recorded login activity.
It also provides a direct link to edit the WordPress user profile.
Recent Activity
Displays recently modified posts, pages, and compatible custom content types.
Each item includes its title, content type, publication status, and modification date.
User Activity
Provides an overview of recent content updates made by website users.
Information includes the user's name, assigned role, modified content, and activity date.
A recent activity status indicator is also included.
Users
Displays registered WordPress users along with their roles, email addresses, and connection status.
Direct links to user profiles are also available.
Plugins
Displays a list of installed plugins, including:
Plugin name.
Version.
File size.
Active or inactive status.
Analytics
Integrates a statistics card for viewing website performance information. Its availability depends on the Analytics configuration and the permissions assigned to each user role.
Important: User Activity, Users, and Plugins cards are restricted to users with administrative permissions.
Personalized Layout
Each user can customize the arrangement of their available dashboard cards.
Available Features
Reorder Cards: drag cards to change their position within a column.
Move Up or Down: adjust card order through the individual card menu.
Hide Cards: temporarily remove unnecessary cards from view.
Show Cards: restore hidden cards through the card manager.
Restore: return available cards to their default arrangement and visibility.
Layout preferences are saved independently for each user.
Card Manager
Use the three-dot button at the top of the Dashboard to view available cards, control their visibility, and change their order.
Cards remain within the sections and columns defined by DashUI.
Overview & Analytics Views
The Modern Dashboard organizes information into two main views.
Overview
The main dashboard screen combines profile, recent activity, user activity, users, and plugins cards, depending on the active settings and user permissions.
Its two-column layout keeps information organized and accessible.
Analytics
Provides a dedicated view for website statistics. This tab appears only when Analytics is enabled and the current user has permission to access it. DashUI remembers the last selected tab in the browser for easier access on future visits.
Welcome Message
Customize the greeting displayed at the top of the dashboard, before the user's name.
For example:
Hello, Manuel
Replace the default text with a message that reflects your preferred communication style.
The user's name is automatically appended to the configured message.
Default value: Hola,
How to Configure Dashboard
Open DashUI and select the Dashboard module.
Enable Modern Dashboard.
Configure the welcome greeting, profile, recent activity, and Analytics visibility settings.
Customize the welcome message.
Click Save.
Open the WordPress Dashboard to view the redesigned interface.
Use the card manager to organize your content.
Restore the Default Layout
From the Dashboard, open the card manager and select Restore to recover the default layout of your available cards.
Important Considerations
The Modern Dashboard replaces the appearance of the classic WordPress dashboard, not the underlying administrative functionality.
Card layouts are saved individually for each user.
Module visibility settings control their corresponding cards.
Administrative cards are restricted to authorized users.
Analytics requires a configured data source and the appropriate permissions.
Cards can be reordered within their assigned columns but cannot be freely moved between all sections.
The two-column preview in the settings module illustrates the dashboard structure; it is not a separate visual layout editor.
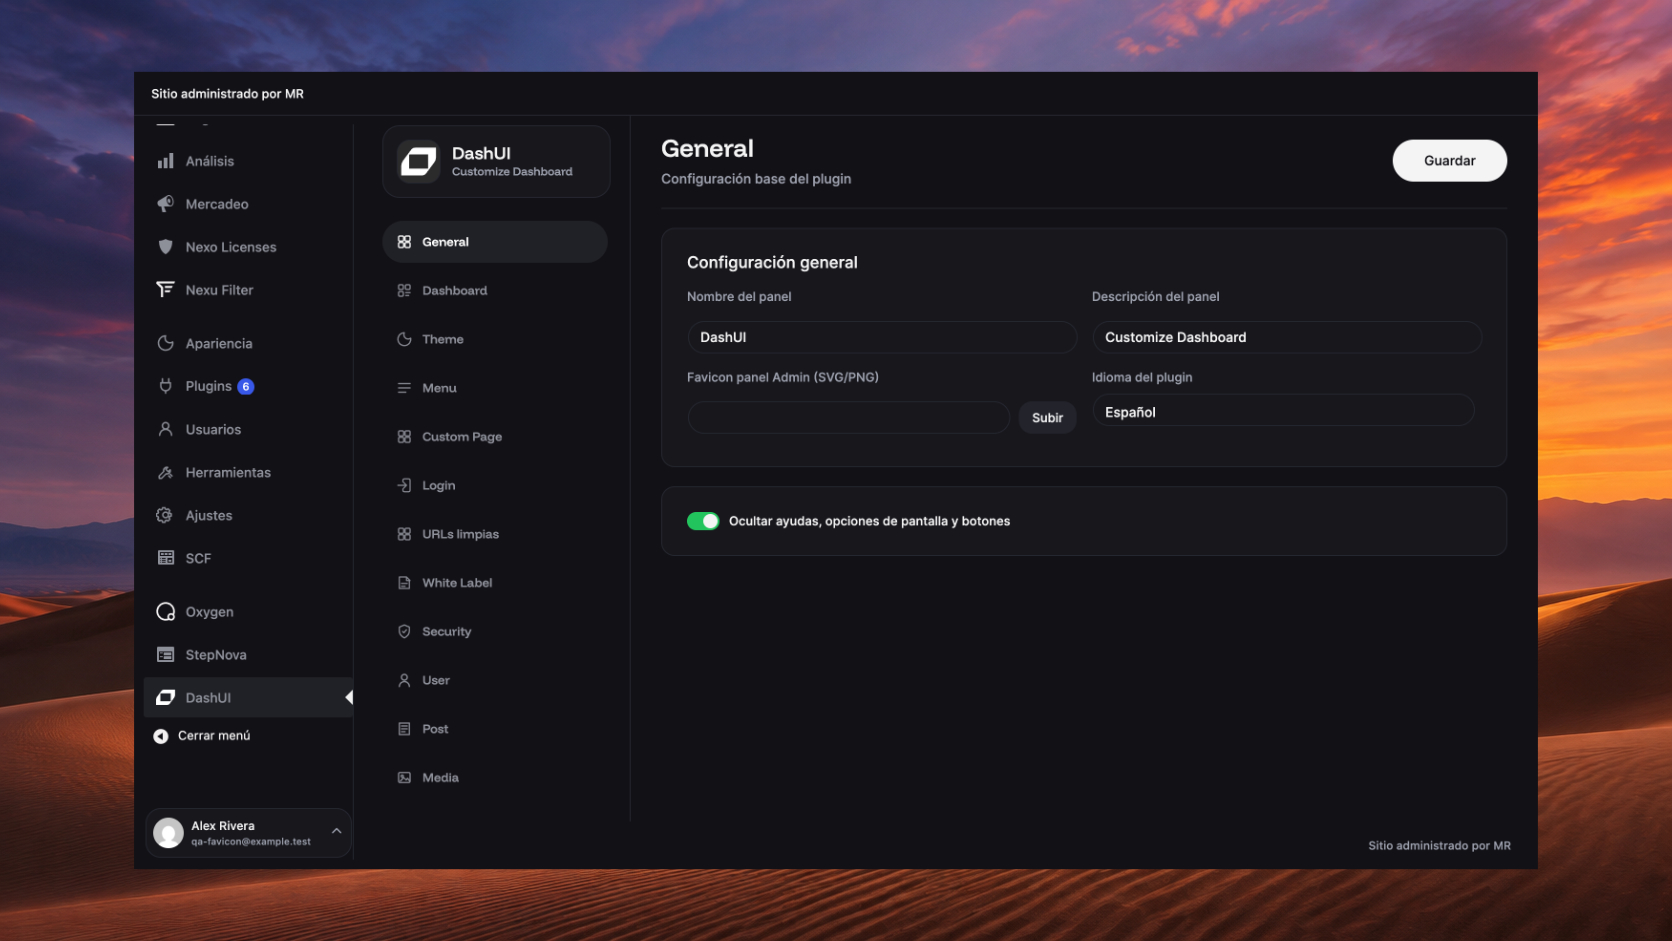
Configure DashUI's essential settings and adapt its identity to your project. Customize the dashboard name, description, and icon, select your preferred language, and simplify the WordPress admin interface.
Dashboard Identity
Customize the elements that identify DashUI within its settings panel.
Dashboard Name
Define the name displayed in the DashUI sidebar header. You can use your brand, company, or project name.
Default value: DashUI.
Dashboard Description
Add a short description below the dashboard name to complement your administrative environment's identity.
Default value: Customize Dashboard.
Admin Panel Favicon
Select a custom PNG or SVG icon to replace the default DashUI icon.
How to configure it:
Click Upload.
Select an image from the WordPress Media Library.
Confirm your selection and save the changes.
If no image is configured, DashUI uses its default icon, automatically adapted to the Dark or White visual mode.
Important: this option changes the icon displayed within the DashUI panel, not your website's public favicon.
Plugin Language
Select the language used throughout the DashUI interface.
Available Languages
Español: displays the interface in Spanish.
English: displays the interface in English.
Default value: Spanish.
The plugin language is configured independently of your WordPress site's general language settings.
To change it, select your preferred language and click Save.
Admin Interface Simplification
DashUI allows you to reduce certain native WordPress interface elements for a cleaner administrative environment.
Hide Help, Screen Options, and Buttons
When enabled, DashUI hides:
Help: informational tabs located at the top of the admin area.
Screen Options: native controls for configuring the current view.
Compatible Header Buttons: certain action buttons displayed alongside admin page titles.
Default state: Enabled.
This setting changes element visibility without removing functionality or modifying user permissions.
Admin screens belonging to external plugins retain their original header controls.
How to Configure General
Open WordPress and navigate to DashUI.
Select the General module.
Customize the dashboard name and description.
Upload an icon if you want to use your own visual identity.
Select your preferred language.
Enable or disable admin interface simplification.
Click Save to apply your changes.
Important Considerations
The custom name and description appear in the DashUI panel header.
The custom favicon does not change your website's public icon.
SVG file availability in the Media Library depends on your WordPress configuration.
General settings do not replace the features provided by Theme, White Label, or Menu.
Interface simplification hides specific visual controls without modifying WordPress capabilities.
Transform the WordPress login screen with DashUI. Customize the logo, images, colors, and form layout to create a login experience that reflects your brand's visual identity.
Custom Login Activation
DashUI allows you to replace the default WordPress login appearance with a personalized design.
Available Options
Enable: activate or deactivate login screen customization.
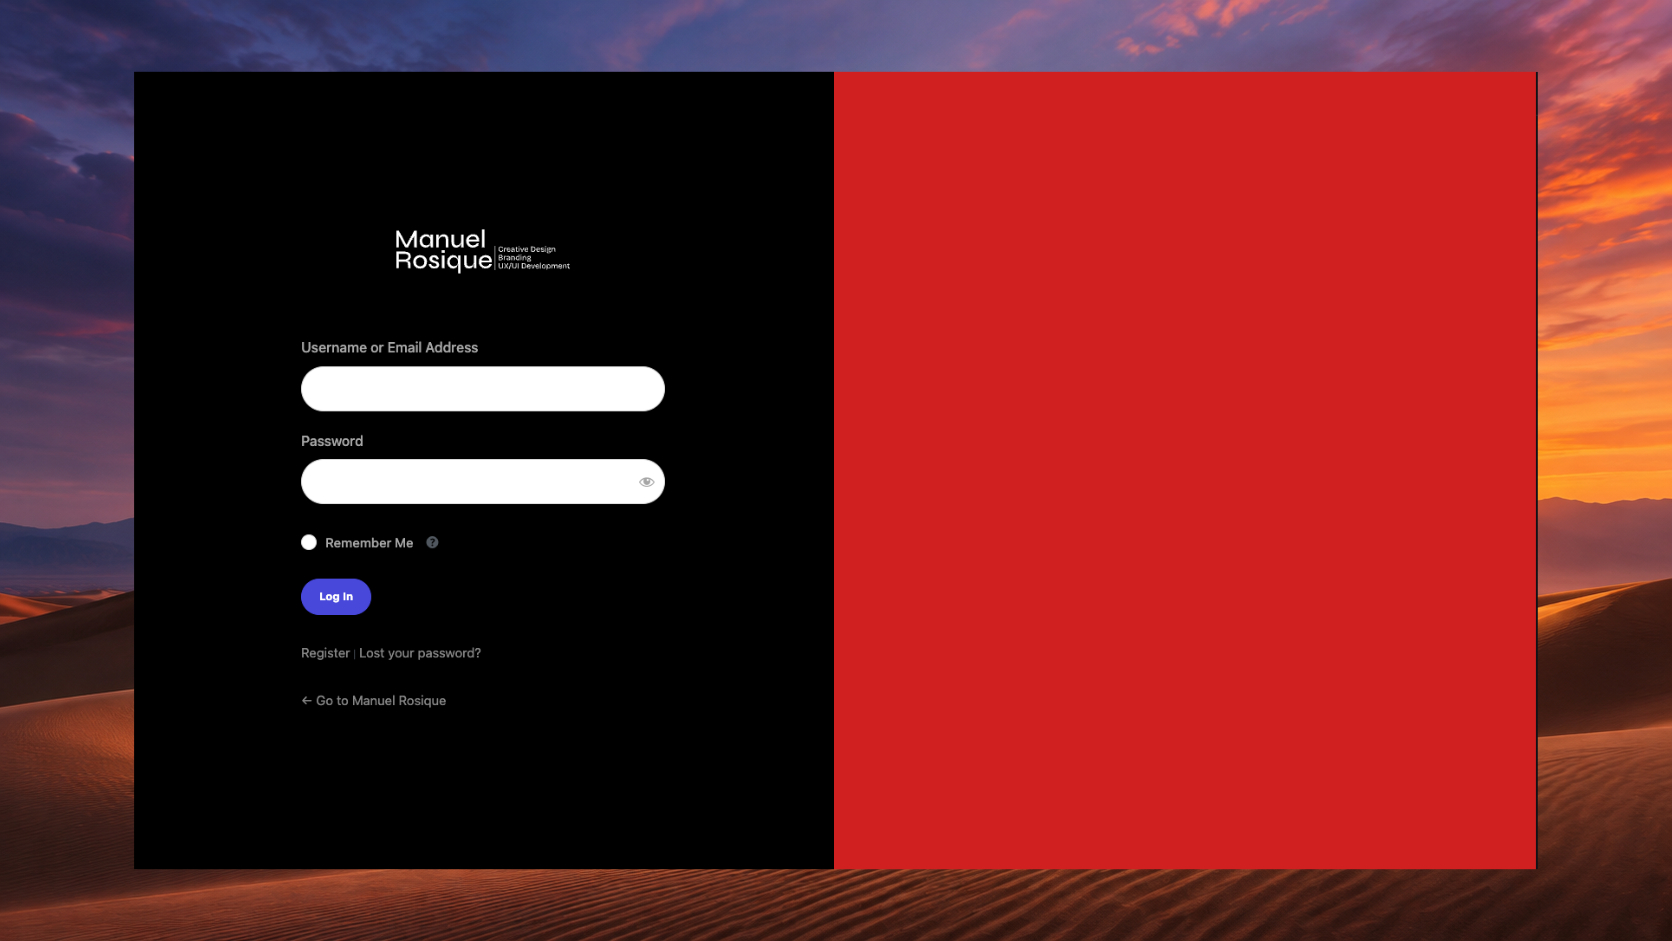
Two-Column Layout: organize the screen into a login form area and a custom image area.
When customization is disabled, WordPress retains its original login design.
Default state: Enabled.
Visual Identity & Layout
Customize the main elements of your login screen.
Custom Logo
Replace the default WordPress logo with your own branding.
Available Options:
Login Logo PNG/SVG: select a custom logo from the WordPress Media Library.
Logo Width: adjust the logo size between 40 px and 420 px.
Logo Position: choose left, center, or right alignment.
Side Image
Add a custom image to complement the login form.
The image occupies its own column and adapts to the available space, maintaining a balanced visual composition.
Form Position
Choose between two layouts:
Form Left: the login form appears on the left, with the image on the right.
Form Right: the image appears on the left, with the login form on the right.
Background Colors
Customize the colors of both main areas:
Image Column Background: define the background color of the visual section.
Form Column Background: set the background color behind the login form.
Form Fields & Button Customization
Adapt the appearance of login controls to maintain a consistent brand identity.
Field & Checkbox Shape
Choose from three available styles:
Rounded: slightly rounded corners.
Pill-Shaped: fully rounded corners.
Square: straight corners.
The selected style applies to input fields and the “Remember Me” checkbox.
Login Button Style
Customize the form's main action button.
Available Options:
Button Shape: rounded, pill-shaped, or square.
Submit Button Position: left, center, or right.
Login Button Color: define the background color.
Button Text Color: customize the text color.
Label & Text Color
Configure the color of labels and supporting form text to match your brand palette.
Language Selector & Live Preview
Hide Language Selector
Enable Hide Login Language Selector to remove the native WordPress language selector from the login screen.
This setting changes the selector's visibility without modifying the website's main language.
Login Live Preview
DashUI includes a live preview that lets you visualize changes while customizing your login form.
Preview the following elements:
Logo and alignment.
Side image.
Column arrangement.
Background colors.
Field and button styles.
Submit button position.
Language selector visibility.
The preview updates as you change the settings, before saving your configuration.
How to Configure Login
Open DashUI and select the Login module.
Enable login screen customization.
Upload your brand logo and adjust its size and position.
Select an image for the side column.
Choose the form position.
Customize both column background colors.
Configure field, checkbox, and button styles.
Adjust the language selector visibility.
Review the result in the live preview.
Click Save to apply your changes.
Check the Result
Open your WordPress login page to view the customized design.
Important Considerations
The Login module changes the appearance of the login screen, not the authentication system itself.
Its settings are independent of Theme and White Label.
On screens up to 900 px wide, DashUI hides the image column and prioritizes the login form.
Images are selected from the WordPress Media Library.
SVG availability depends on your WordPress configuration.
The login logo links to your website's homepage.
Customize your WordPress login address with DashUI. Create a personalized login URL tailored to your project while maintaining compatibility with WordPress's original routes and plugins.
Custom Access URLs
DashUI allows you to create an alternative route to access the WordPress login form, replacing the traditional visible address with a simpler, customized URL.
Enable Clean Login URL
Enable or disable access through a custom address.
When enabled, DashUI registers the new route and uses it to generate WordPress login links.
Example:
Original route: yoursite.com/wp-login.php
Custom route: yoursite.com/login/
The original route remains available as a fallback to preserve WordPress compatibility.
Login Route Customization
Define the name used in your website's login URL.
Login Route
Enter a custom identifier in the corresponding field.
For example:
/login/
/access/
/signin/
/my-account/
DashUI automatically generates the complete address using your WordPress site's domain.
Default value: login
URL Normalization
DashUI processes the identifier to maintain a format compatible with WordPress routing.
It also prevents the use of certain reserved system routes, such as wp-admin, wp-json, and wp-content.
If the entered route is empty or reserved, the plugin restores the default value.
Redirection & Compatibility
Clean URLs works with the existing WordPress login system without replacing its original files.
Custom Login Redirection
When a visitor who is not logged in attempts to access wp-login.php, DashUI can redirect them to the customized URL.
Similarly, when an unauthenticated user accesses the admin area, DashUI uses the configured route to display the authentication form.
WordPress Compatibility
The module preserves:
Native WordPress login functionality.
Original WordPress routes.
Post-login redirection parameters.
Password recovery and reset processes.
Compatibility with plugins that require original WordPress routes.
Important: Clean URLs does not block wp-login.php or internally replace wp-admin. It adds an alternative address and handles specific redirects for unauthenticated users.
Server Requirements
Custom routes require server support for WordPress URL rewriting.
DashUI checks whether a compatible rewriting mechanism is available.
Protected Compatibility
If URL rewriting is unavailable, WordPress retains its original routes to help prevent access issues.
When you change the configuration, DashUI also refreshes the corresponding rewrite rules.
Recommendation: use a permalink structure compatible with WordPress-friendly URLs.
How to Configure Clean URLs
Open WordPress and navigate to DashUI.
Select the Clean URLs module.
Enable Clean Login URL.
Enter your preferred identifier in Login Route.
Review the complete URL displayed below the field.
Click Save.
Open the new address in another browser window to verify access.
Changing the Route
You can update the identifier whenever needed. Save the new configuration and use the updated address for subsequent logins.
Important Considerations
Clean URLs customizes only the login route; it does not change the internal WordPress admin address.
Original WordPress routes remain available for compatibility.
The module does not replace authentication mechanisms or provide attack protection on its own.
Custom URL availability depends on the server's rewriting configuration.
Before sharing the new address with other users, verify that it works correctly.
Login form appearance is configured independently through the Login module.
Transform the way you manage WordPress content with DashUI. Customize how posts, pages, and SCF-compatible content types are displayed through two modern interfaces designed to simplify content organization, viewing, and editing.
Modern Interface Activation
DashUI allows you to replace traditional WordPress content lists with a customized admin interface.
Modern Post, Page & SCF
Enable this option to apply DashUI's modern views to compatible content management sections.
Compatible areas:
WordPress Posts.
WordPress Pages.
Custom post types with a compatible admin interface, including those created with Secure Custom Fields (SCF).
When disabled, WordPress retains its native content list appearance.
Default state: Enabled.
Display Modes
DashUI provides two ways to view and manage content.
Table View
Displays content in a modern table while preserving native WordPress controls and operations.
Available Features:
Customizable Columns: show, hide, and reorder available fields.
Search: find posts directly from the content list.
Filters: use the filtering controls provided by WordPress.
Status Indicators: visually identify publication status.
Individual Actions: access available actions from a three-dot menu.
Multiple Selection: select multiple items for bulk actions.
Progressive Loading: load additional posts while scrolling through compatible lists.
For non-hierarchical content, items load in batches of 10. Hierarchical content retains its native WordPress query behavior.
Panel View
Organizes content into a split interface featuring a post list and a detailed information panel.
Available Features:
Content List: browse available posts and select an item.
Details: view information such as status, author, date, and content URL.
Preview: display a preview when a public URL is available.
Search & Filters: find content and browse available publication states.
Sorting: organize posts alphabetically by title or author.
Quick Actions: edit, view, duplicate, or create content, depending on permissions.
Multiple Selection: select posts for compatible bulk deletion actions.
The list also supports progressive loading to simplify navigation through large content collections.
Default view: Table.
Column & Field Customization
Both views allow you to customize the information displayed in content lists or detail panels.
Table View
Under Settings → Columns, you can:
Enable or disable columns.
Reorder columns using drag and drop.
Organize available fields for each content type.
Panel View
Under Settings, you can:
Select which fields appear in the detail panel.
Rearrange their display order.
Show information provided by compatible native WordPress columns.
Field preferences are stored in the browser's local storage and organized by content type.
Content Management
DashUI preserves WordPress administrative functionality and integrates it into its modern interfaces.
Post Actions
Depending on user permissions and content type, you can:
Create new posts.
Edit existing content.
View published content.
Duplicate content.
Use trash and deletion actions.
Manage multiple records through bulk operations.
Editing & Taxonomies
In Panel View, DashUI also provides a customized presentation for certain compatible editing and taxonomy management screens.
These interfaces preserve native WordPress forms and mechanisms.
Important: not all editors and plugins use the same structure. The block editor and certain custom admin screens may retain their original appearance.
User Permissions
Available actions respect the permissions configured in WordPress.
When a role has read-only access through compatible DashUI features, modification actions are restricted.
How to Configure Post
Open DashUI and select the Post module.
Enable Modern Post, Page & SCF.
Under View, select Table or Panel.
Click Save.
Open Posts, Pages, or a compatible custom content type.
Use the view switcher to change between Table and Panel as needed.
Customize visible fields through Settings.
Changing a Section's View
The built-in view switcher lets you change between Table and Panel without returning to the Post module.
DashUI saves the selected mode for the corresponding content type.
Important Considerations
The Post module primarily changes how content is displayed and organized in the admin area.
It does not automatically modify posts or their public design.
Table View preserves native WordPress controls.
Custom post types must provide a compatible admin interface.
Creation, editing, and deletion actions depend on user permissions.
Column preferences are stored locally in the browser.
Some editing screens and external plugins retain their original interfaces.
The initial view is configured through Post, while changes made from content lists can be saved per content type.
Transform the WordPress Media Library with DashUI. Organize, preview, and manage images, videos, documents, and other files through a modern interface designed to simplify media browsing, information management, and editing.
Modern Media Activation
DashUI allows you to replace the traditional WordPress Media Library interface with a customized administrative layout.
Enable or Disable Modern Media
Enable this setting to apply the modern design to your WordPress Media Library.
The interface is organized into three main areas:
File Browser: browse, search, and filter media items.
Preview Area: view the selected file.
File Details: review file information and access management actions.
When disabled, WordPress retains its traditional Media Library interface.
Default state: Disabled.
File Browsing & Organization
Modern Media includes tools to locate and manage files stored in WordPress.
File Search
Use the built-in search field to find media items in your library.
Results update as you enter your search.
File Type Filters
Browse your media library using the available categories:
All: all files.
Images: image files.
Videos: video files.
Audio: audio files.
PDF: PDF documents.
Documents: text documents and office formats.
Other: additional file types.
Categories appear when matching files are available in the library.
Progressive Loading
DashUI uses progressive loading to simplify navigation through large media libraries.
Files load in batches of 30 items, with additional results appearing as you reach the end of the list.
Upload Files
Use the + button to open the native WordPress media upload screen.
File Preview & Information
When you select a media item, DashUI displays its content and properties.
Central Preview
The central area allows you to:
Preview images.
Play compatible video files.
Identify other files by type and filename.
For files without a supported visual preview, DashUI displays an informational representation.
File Details
The sidebar provides information including:
Filename.
File ID.
MIME type and format.
Dimensions, when available.
File size.
Upload date.
Modification date.
Author.
The file URL is also available for reference.
Used In
The Used In section helps identify certain posts or pages where the selected file is referenced.
DashUI checks known relationships, such as featured images, attachment associations, and references within post content.
Important: this detection is informational and may not identify every use of a file, particularly within visual builders, custom fields, or external content.
Editing & File Management
Modern Media includes actions for managing files directly from its interface.
Edit Information
Use the Edit option to modify:
Title: the file title.
Alt Text: alternative text.
Caption: image or file caption.
Description: additional file information.
Changes are made through an editing dialog and applied using Save Changes.
Available Actions
Open File: opens the original file URL.
Edit File: allows you to modify descriptive metadata.
Replace Image: opens the native WordPress media selector to choose or upload another image and select it in the library.
Delete: permanently deletes the selected file after confirmation.
Important: in this version, Replace Image does not overwrite the original file or automatically preserve its URL. It selects a different media library item.
Multiple Selection
DashUI allows you to select multiple files using individual checkboxes.
When two or more files are selected, the Delete action becomes available, allowing you to remove the selected files after confirmation.
Editing and deletion actions are subject to the user's permissions.
How to Configure Media
Open DashUI and select the Media module.
Enable Modern Media.
Click Save.
Navigate to Media → Library in WordPress.
Use the search field or filters to locate files.
Select an item to view its preview and details.
Use the available editing, selection, or deletion actions as needed.
Restore the Traditional Library
To restore the original WordPress Media Library appearance, disable Modern Media in DashUI and save your changes.
Important Considerations
Media changes the Media Library interface without altering the underlying file storage system.
File operations use media attachments registered in WordPress.
The modern interface applies to the main Media Library screen.
Files load progressively in batches of 30.
The “Used In” section provides detected references, not a complete usage inventory.
File deletion is permanent and requires appropriate permissions.
Replace Image does not physically replace the original file in this version.
The module does not provide automatic image compression, file conversion, or image optimization.
Customize the way you manage WordPress plugins with DashUI. Explore installed plugins, review their information, and manage activation, updates, and settings through a modern, organized interface.
Modern Plugins Activation
DashUI allows you to replace the traditional WordPress plugins list with a customized administrative interface.
Enable or Disable Modern Plugins
Enable this setting to apply the new design to the installed plugins screen.
The interface is organized into two main areas:
Plugin List: displays installed plugins and allows you to search for and select individual items.
Information Panel: displays plugin details and available management actions.
When disabled, WordPress retains its traditional plugins interface.
Default state: Disabled.
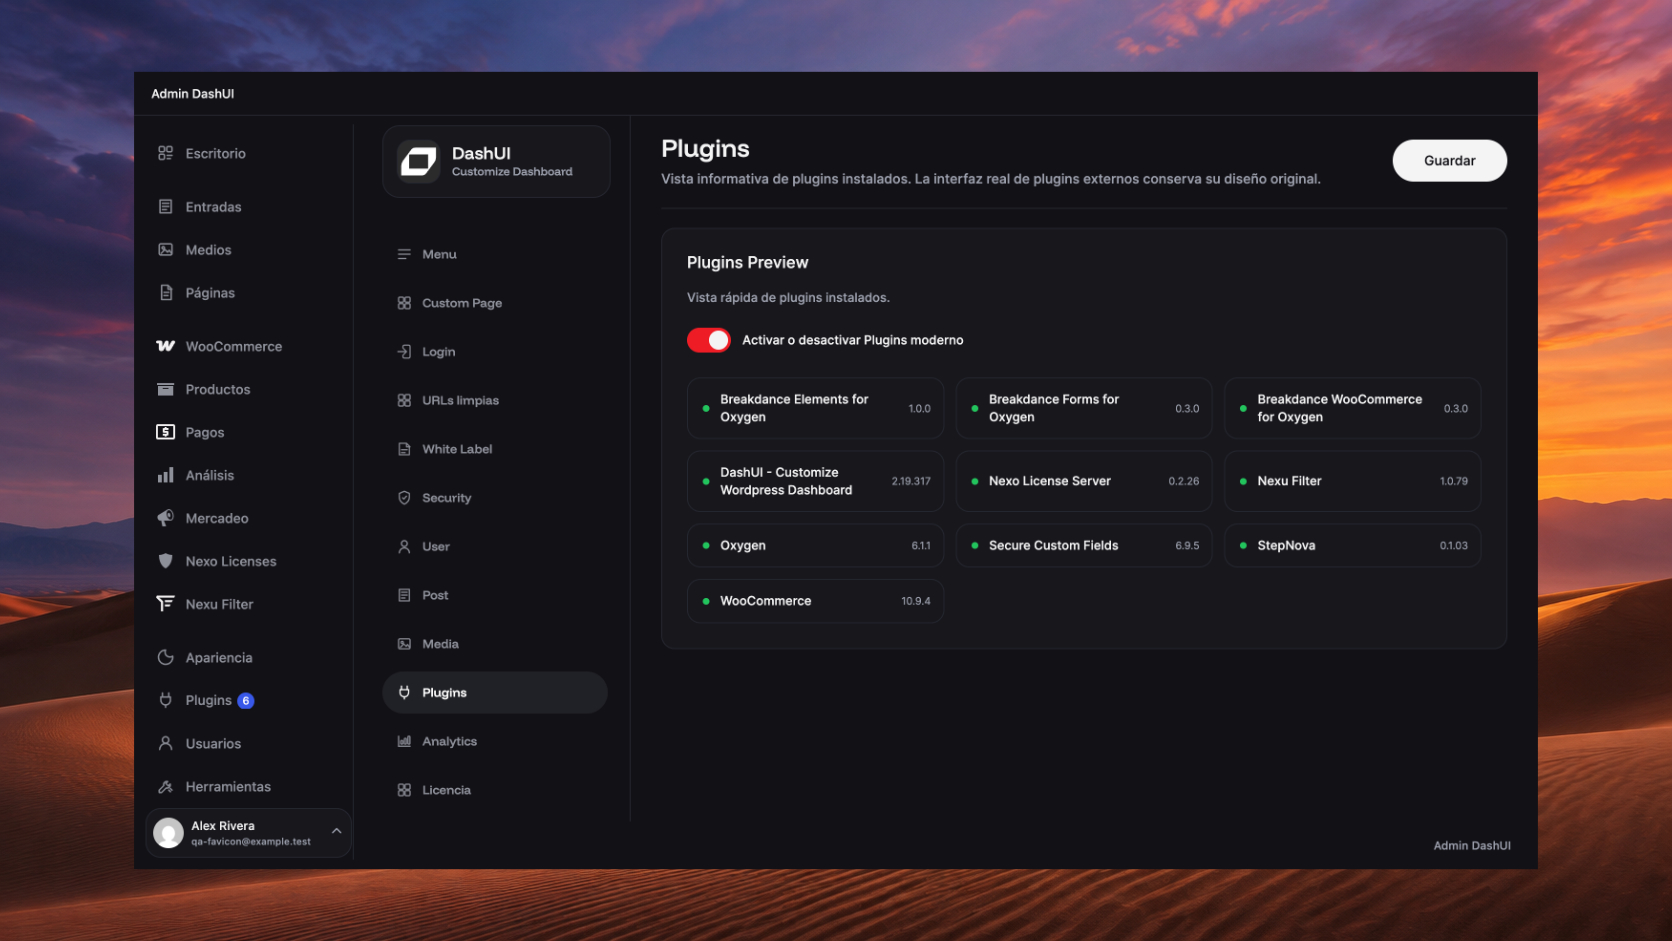
Plugins Preview
The module includes a Plugins Preview section displaying installed plugins, their versions, and their active or inactive status.
This provides a quick overview of available plugins before enabling the modern interface.
Plugin Browsing & Search
The modern interface includes tools for locating and reviewing installed plugins.
Plugin List
Each item displays:
Name: identifies the installed plugin.
Developer: displays the plugin author.
Version: shows the installed version.
Status: indicates whether the plugin is active or inactive.
Update Available: displays an indicator when WordPress detects an available update.
Plugin Search
Use the built-in search field to find plugins by:
Name.
Author.
Version.
Results are filtered as you type.
Plugin Selection
Click any plugin in the list to display its details in the information panel.
You can also use the three-dot menu to quickly access its primary actions.
Plugin Information & Management
When you select a plugin, DashUI displays its information and available management tools.
Plugin Information
The details panel includes:
Plugin name.
Active or inactive status.
Installed version.
Author.
Description.
Minimum required WordPress version.
Minimum required PHP version.
WordPress Multisite compatibility indicator, when applicable.
Link to the plugin website, when available.
Primary Actions
Depending on the plugin's status and the user's permissions, you can access:
Activate: enables an inactive plugin.
Deactivate: disables an active plugin.
Update Now: runs an available update through WordPress.
Delete: starts the deletion process using the native WordPress confirmation mechanism.
Actions appear only when WordPress makes them available for the selected plugin.
Additional Links
DashUI also preserves additional links provided by WordPress or the plugin itself, including access to settings and other plugin-specific features.
Updates & Installation
Automatic Updates
When supported by WordPress, the information panel includes a control for enabling or disabling automatic updates for the selected plugin.
Available Options:
Enable automatic updates.
Disable automatic updates.
DashUI uses the native WordPress update system without replacing its functionality.
Available Updates
When a new version is available, DashUI displays an update indicator alongside the plugin and provides an Update Now action when supported.
Add Plugins
The Add button opens the WordPress plugin installation screen.
DashUI also visually customizes the native WordPress plugin installation interface while preserving its original features:
Browse the plugin directory.
Search for plugins.
Navigate installation tabs.
Upload ZIP files.
Install plugins.
Installation continues to use native WordPress mechanisms and permissions.
How to Configure Plugins
Open WordPress and navigate to DashUI.
Select the Plugins module.
Enable Modern Plugins.
Click Save.
Navigate to Plugins → Installed Plugins.
Use the search field to locate a plugin.
Select a plugin to review its information.
Use the available actions to activate, deactivate, update, or manage the plugin.
Restore the Traditional View
To restore the original WordPress interface, disable Modern Plugins in DashUI and save your changes.
Important Considerations
Plugins customizes the installed plugins management interface, not the internal settings screens of individual plugins.
Activation, deactivation, updating, and deletion continue to use native WordPress mechanisms.
Available actions depend on each plugin and the user's permissions.
Plugin deletion confirmation screens retain the native WordPress process, with styling adapted by DashUI.
The installation screen receives visual customization without replacing its original forms, search tools, or installation processes.
During certain administrative operations, DashUI preserves the native interface to avoid interfering with WordPress processes.
The module does not include an independent licensing manager for external plugins or modify their internal functionality.
Monitor your website's performance directly from WordPress with DashUI. Bring together traffic statistics, visitor activity, content performance, and e-commerce data through a visual interface that centralizes information and controls what each user can access.
Analytics Data Sources
DashUI allows you to choose the system providing statistical data for the Analytics module and the Dashboard's Analytics view.
Site Kit
Integrate Google Analytics 4 and Google Search Console data through Site Kit by Google.
This option provides insights into website traffic, visitor behavior, content performance, and organic search visibility.
DashUI uses the connection and permissions managed by Site Kit without requiring additional Google credentials.
Available Features:
Check connection status.
Open Site Kit settings.
View website analytics.
Refresh reports.
Share authorized data with the Dashboard.
Nexo Analytics
DashUI also includes Nexo Analytics, an internal analytics system that records and displays website activity without requiring a Google Analytics account.
Its capabilities include:
Page view tracking.
Admin screen activity tracking.
Session identification.
Most-viewed pages.
Navigation event tracking.
Scheduled statistical processing.
Nexo Analytics uses its own WordPress database tables and displays information about its tracking and processing status.
Important: Nexo Analytics metrics are generated from internally collected activity and may differ from Google Analytics 4 measurements.
Performance Statistics
With Site Kit connected, DashUI displays a visual summary of your website's primary metrics.
Key Metrics
Users: visitors recorded during the selected period.
Sessions: total browsing sessions.
Views: page and screen views.
Engagement Rate: percentage of engaged sessions.
Key Events: important events configured in Google Analytics.
Revenue: revenue reported by the data source, when available.
Available Reports
Activity: a chart showing traffic trends throughout the selected period.
Top Pages: identifies pages with the highest number of views.
Traffic Sources: displays the channels visitors use to reach your website.
Devices: shows traffic distribution across mobile devices, tablets, and desktop computers.
Countries: identifies countries generating website activity.
Events: displays interactions recorded by Analytics.
Ecommerce: provides product revenue information when relevant data is available.
Organic Performance & Opportunities
When Google Search Console is connected through Site Kit, DashUI includes information about your website's organic search visibility.
SEO Metrics
Clicks: visits generated from search results.
Impressions: the number of times your website appears in search results.
CTR: the percentage of impressions resulting in clicks.
Average Position: your website's average position in search results.
SEO Reports
Top Queries: identifies search terms generating organic traffic.
Organic Pages: displays pages receiving visits from search engines.
CTR Opportunities: highlights queries with meaningful impressions and relatively low click-through rates.
Performance Comparison
DashUI also includes a section for comparing the selected period against the previous equivalent period.
It helps identify:
Changes in users and sessions.
Variations in views and events.
Differences in available revenue data.
Changes in clicks, impressions, and CTR.
Observations about traffic growth, decline, or stability.
Observations are generated from calculated changes in the available data.
Note: actual Search Console reports require the corresponding integration through Site Kit. Nexo Analytics does not replace Google Search Console.
Date Ranges
Select the period you want to analyze.
Available Periods
7 Days: activity during the past seven days.
30 Days: performance during the past thirty days.
90 Days: trends over the past ninety days.
This Month: data from the current month.
Last Month: statistics from the previous month.
Custom: select a starting and ending date.
Use Refresh for Site Kit reports or Apply for Nexo Analytics to load the selected period.
Default period: 30 days.
Dashboard Analytics & Role Permissions
DashUI allows you to integrate statistics into the modern WordPress Dashboard and define which information each user role can access.
Access Levels
Full
Provides access to general metrics and detailed reports, including traffic, devices, pages, acquisition sources, events, and other available statistics.
Summary
Displays general performance information, trends, and a summary of available organic metrics without exposing all detailed reports.
Hidden
Prevents the role from accessing the Dashboard's Analytics section.
Role-Based Configuration
Under Dashboard Analytics, assign the appropriate access level to each registered WordPress role.
Administrators always retain full access.
Other roles can be configured individually.
Custom roles can also receive analytics permissions.
If a user has multiple roles, the highest assigned access level applies.
Default setting: Analytics is hidden for non-administrator roles.
How to Configure Analytics
Using Site Kit
Open DashUI and select the Analytics module.
Under Analytics Source, select Site Kit.
Click Save Source.
Install and configure Site Kit by Google if it is not connected.
Check the connection from DashUI.
Select the reporting period.
Review your reports and refresh the information.
Configure permissions under Dashboard Analytics.
Click Save Access.
Using Nexo Analytics
Open DashUI and navigate to Analytics.
Select Nexo Analytics as your data source.
Click Save Source.
Review the database and tracking system status.
Select the period you want to analyze.
Review available page views, sessions, top pages, and recorded events.
Configure role-based viewing permissions.
Nexo Analytics collects website and admin activity through its internal tracking system.
Important Considerations
DashUI centralizes analytics information but does not replace the Google accounts or permissions managed by Site Kit.
Metric availability depends on the selected source and the data recorded.
Complete SEO reporting requires Google Search Console connected through Site Kit.
Nexo Analytics collects internal metrics that may differ from Google's statistics.
When WooCommerce is available, the Dashboard can include order and product revenue information.
Site Kit data is synchronized with the Dashboard through authorized reports; some metrics may remain unavailable until synchronization occurs.
Role permissions control the Analytics information displayed within the Dashboard.
Nexo Analytics does not store real IP addresses, passwords, email addresses, or form values as part of its captured events.
Analytics must be configured in accordance with applicable website privacy and consent requirements.